Wednesday, December 16, 2015

Finals Schedule / Final Project

Business 8:00-8:25 AM
1st Final 8:25-9:55 AM

Break 9:55-10:13 AM
Passing 10:13-10:20 AM

Business 10:20-10:45
2nd Final 10:45-12:15

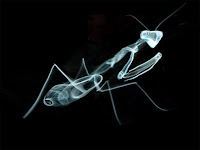
SMOKE SCULPTURES DUE AT THE END OF THE PERIOD

Here is an in-progress and a completed example:


Monday, December 14, 2015


Hi Guys,
Today we are working on ILLUSIONS. Remember, the name of the game here is experimentation and creativity. Just try things out, then look at your results and adjust your position/technique, and retry. Its all about trying-->adjusting-->trying again until you get it right.

TOMORROW IS THE LAST DAY TO BRING CANS FOR EXTRA CREDIT!
Bring them in advisement just to be safe, because I don't know when the people will pick the barrel up.


You will be turning in ONE contact sheet of your four BEST illusions with your partner. Yes, this one time you get to share work. Thats ONE contact sheet of four images with 2 people's last names on it.

Don't forget to do levels and basic cropping.

Thursday, December 10, 2015

Rainy Day schedule :( :( :(

Open a new document in Microsoft Word.
Click “insert” and insert your best photo yet. Resize your photo so it’s small enough to fit in the Word document.

Write a critique of your picture. (At the very least 1 page double spaced) Make your sentences complete and use descriptive language. This will be written like a discussion paper, not a numbered list.  

Here are steps to guide you for each paragraph:
1.     Describe your photo. What is the photo of? What objects can you see in it? Talk about the time of day, location, people, plant life, animals, building or other materials you see.
2.     Talk about the composition. What angles, or viewpoints were used to shoot the photo? Was the rule of thirds used, and how? (What objects or parts of the photo are lined up on what part of the grid)
3.     Describe the use of elements. Is shape used? Texture? Value, color, space, form, line?  Talk about where and how. If an element is not used, its ok to say so, for example: “This photograph does not use color since it is black and white” or simply, “There are no shapes in this photo”.
4.     Describe and discuss what you like about it and why.

5.     Describe and discuss what you think could be done differently and why.

Save your image as lastname_firstname_selfcritique.doc
Tomorrow we will be peer-reviewing them and checking for vocab usage.

Wednesday, December 9, 2015

Zero Gravity Illusions

Today we are starting our last project before winter break. Its creative, fun, and a little more challenging than it looks. Check out some examples below:


Tuesday, December 8, 2015

As with yesterday, today you will finish and turn in your nature name and contact sheet. If you are already finished, you may work on doing more names for extra credit OR you may do the short tutorial on zoom blur effects.

OR you may follow this link to learn to give a photograph jigsaw puzzle effect here:
http://www.photoshopessentials.com/photo-effects/photoshop-puzzle/

Don't worry, it looks REALLY long but it's just a lot of pictures. The steps are fairly simple. You might have trouble finding the "texturizer" because we have a different version of Photoshop than they do. Here's the trick:
Click Filter -->Filter Gallery-->Texture--->Texturizer

<---------Click this little settings tab.
Click Load Texture
Go to the M:/ Miss E folder and select the puzzle.psd file I have left there.Click Open. Play with the sliders until you like the look and size of your puzzle pieces.

Monday, December 7, 2015

Turn in your nature name AND alphabet contact sheet.

If you are finished early, you can create another nature name for someone else.
You can also check out the Miss E folder for a simple, quick little tutorial on how to create a zoom blur effect.

Thursday, December 3, 2015

Nature Alphabet

Continue working on collecting your Natural Alphabet.
Remember: SHOOT IN PORTRAIT ORIENTATION (You must turn the camera sideways)
Remember to SHOOT IN BLACK AND WHITE when possible

When you get back to your computer:
Rotate if needed by clicking Image-->Image Rotation-->90 CW
Remember to CROP TO A 5x7" on EVERY photo
Adjust your LEVELS on every photo

Save all of your letters in their own folder. If you finish editing EVERY picture (remember, they must be cropped to a 5x7!) you can run a 5 column, 6 row contact sheet.


Monday, November 30, 2015

Nature Alphabet and Name

Open the Nature Alphabet powerpoint from the M:/
This will be the new project:


Tuesday, November 24, 2015

TURN IN NAME BANNER

Name your banner LASTNAME_FIRSTNAME_Banner.jpg
I have added a turn-in folder on the M:/ Turn in your name banner today by the end of the period. (As usual, you have a week from today to get it in the folder, BUT I will be adding the scores to Aeries during break, so it may show up as a missing assignment).

 I also added a Quarter 2 extra credit folder, so you can begin collecting your things for extra points there. Just make sure your name is on everything.

Monday, November 23, 2015

Monday

I will let you guys work on name banners through today and tomorrow.

I will show you how to add a border today.

Remember if you are finished early, you should be making a name banner for a friend or family for extra practice and extra credit at the end of the quarter.

Here are the questions you can ask yourself to prepare to turn in your banner:
1. Is it finished/full??
2. Zoom in. Are your cut out items smooth on the edges?
3. Is your text readable?
4. Extras: Did you try adding layer styles on your text, gradient fills, or a border?

Here is my finished example:

Wednesday, November 18, 2015

Wednesday

Today you will keep working on your name banner.
Tests are graded and your scores have been entered on Aeries.

Monday, November 16, 2015

TEST TOMORROW

Reminder: There is a test tomorrow! Study up on your Photoshop/selections.

Grab a sheet of paper. Open the JPG in the Miss E folder titled "selections". It looks like this:

Try to figure out the best selection tool for each job. You can open Photoshop and talk with others and try to figure it out.

When finished, open a new document in Photoshop by clicking File-->New-->
Make sure the drop down menus are set to INCHES, not pixels. Set the document width to 10 and height to 4. Resolution 300.

We are going to use our knowledge of selection tools and cutting to create a name banner. The only rules are: It has to be FULL of items. It has to have your NAME. And it has to have your FACE somewhere. Here are some old examples:


Friday, November 13, 2015

Open your house PSD from yesterday.

TEST TUESDAY.


Bring cans for a max of 10 points extra credit!

Thursday, November 12, 2015

Download the quiz study guide from the Miss E Folder. Save a copy to your computer, and try answering as many questions as you can. Consider it a practice quiz. The highlighted questions are things we have not learned yet, or will learn today.

Later in the period- Download the 3 stock images from the Miss E folder. (A house, a parrot, and a kid) Open these in Photoshop.

CAN DRIVE! 2nd quarter progress reports are coming up soon. You can bring in canned food for extra credit, for a max of 10 points. Make sure to show me so I can write down your credit!

Tuesday, November 10, 2015


Good Morning! Today we will be learning more of the Photoshop Toolbox. In particular, we will look  at the dodge/burn/sponge tools and the blur/sharpen/smudge tools.

Pick a parrot image from the Miss E folder  on the M:/ and open it in photoshop.

Monday, November 9, 2015

Friday, November 6, 2015

Selection Tools

Download the pre-cut Victorian house.jpg from the Miss E folder.
Open this in Photoshop.


Wednesday, November 4, 2015

Lets try to finish up our viewpoints photos and run a contact sheet. Name your photos as posted previously. Then run your contact sheet by going to File--> Automate--> Contact Sheet II. Change your columns and rows to 4 and 4. This will give you 16 spots. Name your contact sheet Lastname_Firstname_viewpoints_contactsheet.jpg and put it in the Viewpoints Contact Sheet folder.

Next you will select a "best photo". Which picture is the very best out of all your viewpoints photos? Which one looks the most artistic and eye catching? If I was going to frame ONE of your photos, which one do you think should go on the wall? Select your BEST and submit it to the viewpoints contact sheet folder as well. You can call it Lastname_Firstname_bestphoto.jpg

You will turn in 2 files, like these:

Monday, November 2, 2015

Rainy Day

It might be raining, but we will continue to work on viewpoints.
You can either begin editing photos you already have (crop if necessary, do your levels, check if saturation needs a boost, even try brightness/contrast) OR you can go take photos.

You can also rename your photos so it becomes easier to see what you still need.
worms_person.jpg
worms_object.jpg
worms_nature.jpg
worms_landscape.jpg
birds_person.jpg
birds_object.jpg
birds_nature.jpg
birds_landscape.jpg
eye_person.jpg
eye_object.jpg
eye_nature.jpg
eye_landscape.jpg
tilt_person.jpg
tilt_object.jpg
tilt_nature.jpg
tilt_landscape.jpg

IF you go take photos, you need to stay under the awnings in the hallways to prevent the camera from getting wet. If you do venture out from under the protected walkway, you need to stick your camera in your hoodie or jacket to protect the camera.

Friday, October 30, 2015

Halloweeeeeen!

Today you will be taking pictures of differing viewpoints and angles.
You will need each of the 4 viewpoints (Worms Eye, Birds Eye, Eye Level, Dutch Tilt) of one man made object, natural item, one person, and a landscape.

So you will need a man made object at worms eye, birds eye, eye level, and tilt.
So you will need a natural object at worms eye, birds eye, eye level, and tilt.
So you will need a person at worms eye, birds eye, eye level, and tilt.
So you will need a landscape at worms eye, birds eye, eye level, and tilt.

Remember to use your RULE OF THIRDS as well! We are building all these techniques together.
Remember to make it look artistic. Plan your shots.

Thursday, October 29, 2015

Thursday

Yesterday I gave feedback on contact sheets and had people change certain pictures and re-shoot. Today we will be creating an info-graphic on Viewpoints, since that will be our next topic.

Viewpoints is all about getting different camera angles so your work doesn't become boring and predictable. Learning to see the world from all different angles and viewpoints is important for any artistic photographer.

1. Open a NEW document in Photoshop named lastname_firstname_viewpoints
2. Change pixels to INCHES, and enter width: 8, height: 10
and resolution: 300
3. Title your page VIEWPOINTS. Somewhere on the page, tell in a complete sentence
why we should change our camera angle sometimes.
4. Open Google. Look up birds eye view, worms eye view, eye level camera angle, and
dutch tilt
5. Provide a definition and a photo example for each
6. Make it look nice


Monday, October 26, 2015

Tuesday- Sub Day

Good morning ladies and gentlemen!
I am at an Adobe Photoshop Users conference today, learning more rad stuff to teach you guys.

You will be finishing your edits, renaming your photos, and running your contact sheets as per the instructions yesterday. I created turn-in folders, so you may turn in your contact sheets if you are finished.

When you finish, there is a paper on the counter for you. You will go through your contact sheet picture by picture and ask yourself some questions about each picture. I filled some example slots out for you. If you need more examples about what is considered artistic, look at yesterday's contact sheet. All of these pictures show forethought and effort. When you finish with this grading sheet, turn it in to the basket with your NAME and PERIOD on it.

If you finish early, you may go take extra photos demonstrating your knowledge of the rule of thirds. You can edit and contact sheet these for extra credit points toward quarter 2.

See you Wednesday!
1. Finish editing all of your 12 rule of thirds photos. See Friday's entry for some extra tips on editing.

2. Rename your photos as such: (you can do this pretty quickly at the end, after you've completed all your edits)
          portrait1.jpg, portrait2.jpg, portrait3.jpg
          landscape1.jpg, landscape2.jpg, landscape3.jpg
          object1.jpg, object2.jpg, object3.jpg
          whatever1.jpg, whatever2.jpg, whatever3.jpg

3. Run a contact sheet containing all 12 of your images by clicking File--> Automate--> Contact sheet II. Select what files you want in the 1st section of the contact sheet menu. Leave the middle section alone! Change the bottom section where it says "columns" and "rows". You want 3 columns and 4 rows (because you have 12 pictures, and 3 x 4 = 12)

4. Name your contact sheet LASTNAME_FIRSTNAME_thirds.jpg

Here is a finished example containing some of my best rule of thirds photos by students:

Friday, October 23, 2015

You should be done taking your 12 Rule of Thirds photographs. Now you will start doing your basic editing: Cropping and levels. Remember, you can use black and white if you choose (Image--> adjustments--> black and white).  You can adjust little things like Hue/Saturation and Brightness/Contrast but remember that the pictures should look natural. You don't want them to look fake and photoshopped.

Thursday, October 22, 2015

Camera Rules

 There are a couple simple rules which dictate our conduct when taking photos around campus:

1. Do not run or speak loudly near classrooms or rally court. Other classes are in session.
2. No groups. Stay with your partner ONLY.
3. No sitting outside, unless you're modeling for someone.
4. Do not leave campus. If we walk to the park, we go as a class.
5. NEVER enter a classroom without prior written permission from the teacher. NEVER. It does not matter if you're their favorite/T.A./cousin/neighbor/whatever. Do not interrupt classrooms.
6. Treat your camera like it's your baby. Wear your neck strap.

Next, there are a couple common problems with peoples photographs:

1. Stay out of the direct sunlight. It usually causes problems like harsh shadows and backlighting. Be careful of backlighting! Whenever you pose your person in front of a bright sky or window, look what happens.

2. Be selective and choosy about your photos. I want them to look like something artistic that you planned. They should not feel like a snapshot you took while just walking around.

3. Remember to use the rule of thirds! Do NOT center your subject.

Wednesday, October 21, 2015

Grab a piece of paper and answer the following: (HINT: It follows the Powerpoint from yesterday, accessible on the M:/)

1.  What is the “subject” of a photograph?

2.  What is “composition”, basically?

3.  What is the “rule of thirds”?

4.  Where should you place your subject on the grid?

5.  What is the point of using the rule of thirds?

6.  Where should the horizon line be in a landscape photo?

7.  Where on the grid should we place someone’s eyes?

8.  How do I get the grid to show on my camera?

9.  If I forgot to use the rule of thirds when I took my picture, what tool can I use in Photoshop to fix it?

10.  How do I find out what I missed when I’m absent??
When you are finished, you can turn your paper in to the basket on the counter, and go take pictures according to the Rule of Thirds. Your goals are to get all of the following
 •3 portraits (photo of a person)

•3 landscapes (a view of the land from afar)

•3 objects

•3 of anything you want


Tuesday, October 20, 2015

Rule of Thirds

Today we are beginning to focus on composition- in particular, the rule of thirds.

  • You will have 10 minutes or so to finish up reflection sheets from yesterday.
  • We will watch a short powerpoint presentation (accessible on the M:/ if you were absent) on the rule of thirds.
  • You will practice cropping several photos according to the rule of thirds.
  • You will go out and take several portrait photos using the grid on the camera to help you align your subject according to the rule of thirds.

Monday, October 19, 2015

Finish sugar skulls today!

Today is the last in class workday for skulls!
  1. Try adding drop shadows to your items by clicking the "Fx" button at the bottom of the layers palette. See the difference drop shadows make below.
  2. When you finish your skull, save your file as LASTNAME_FIRSTNAME_skull.jpg
  3. Remember to change both the file extension (.jpg) and the drop-down menu to JPG. CHECK your file to make sure it will open from the turn-in folder, and that it is not broken.
  4. Get a reflection sheet off the counter and fill it out thoroughly and completely. I want at least a couple complete sentences for each question. BE DESCRIPTIVE.
  5. Turn your reflection sheet into the basket on the counter.
Before and after drop shadows:


Friday, October 16, 2015

Thursday-Friday

Lets finish up skulls today, if we can.
Here is an example of the grading sheet I will be using to evaluate your work. Open your skull and go through each category, scoring yourself. What did you get??


1.       Is it finished (full)? _________(10)
2.       Is the face Symmetrical? ___________(10)
3.       Is radial balance used? _____(10)
4.       Did  
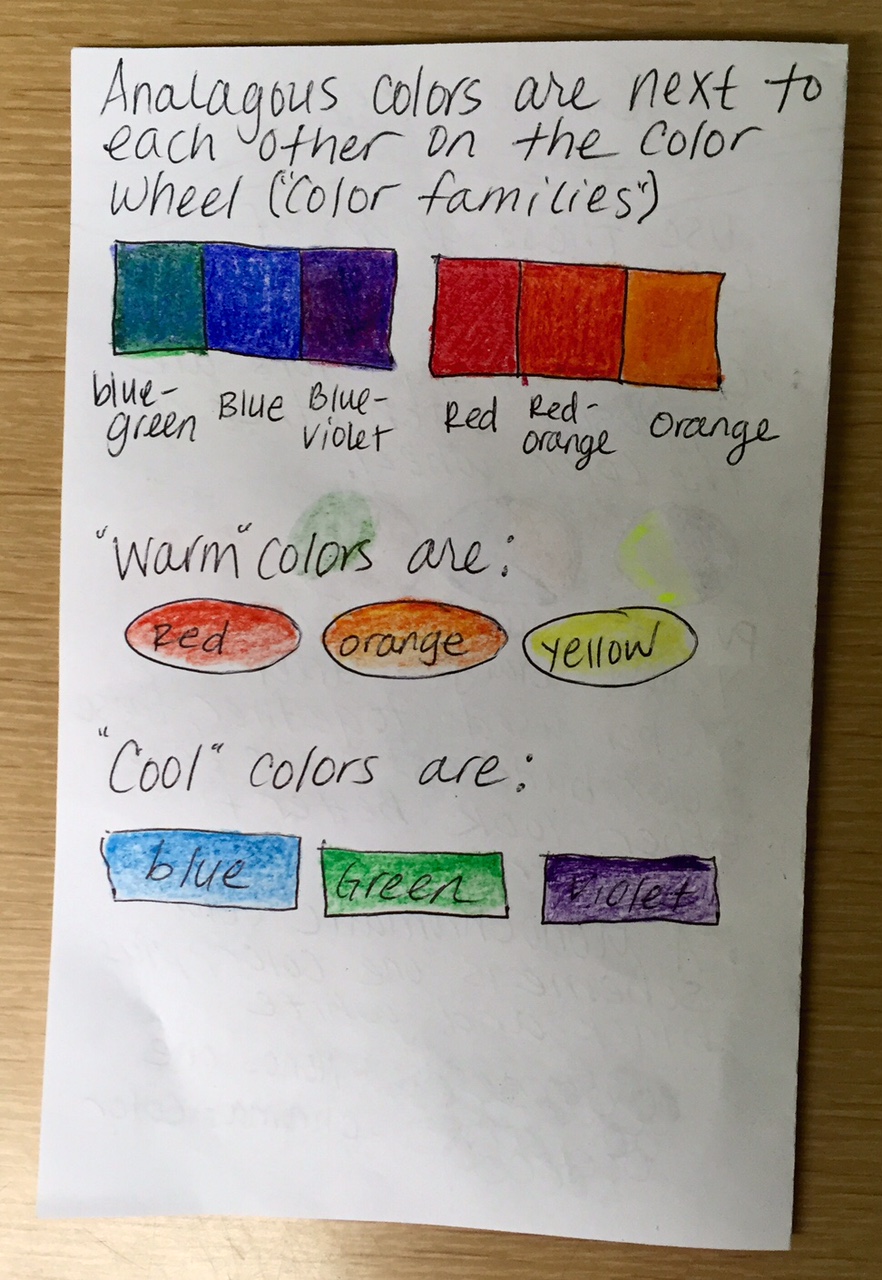
you use complimentary color? _____(10)
5.       Did you use traditional symbols of Day of the Dead? _________ (10)
6.       Overall creativity _____(10)
 
 
TOTAL SCORE: ___________ (70)

When you are finished, download the reflection sheet from the Miss E folder and fill it out. We will be turning it in with our skull.

I am already seeing some great things! Check out Natalie and Alicia's awesome work:

Wednesday, October 14, 2015

Skull Day

Today we are working on skulls.
 Here is a tip: As you begin to fill your skull, you can use this technique to fill empty spots without making the skull look too confusing or cluttered. Color match your "skin" color, or face color. Then make the color slightly darker or slightly lighter using your color picker menu. The effect will look something like this:

Tuesday, October 13, 2015

Today is a sub day- Working on skulls.

We did take a QUIZ on the Photoshop shortcuts we have learned so far, as well as the terms "symmetrical" and "radial". If you were absent, you need to make up the quiz at lunch or after school Wednesday.

Monday, October 12, 2015


Good Morning! Happy Monday!

CHECK YOURSELF: Did you use a complementary color scheme? Is your skull symmetrical (same on both sides)? Did you use RADIAL balance somewhere (circular design)?

QUIZ TOMORROW on the following shortcuts!!!!
Remember:
CTRL J: Copies a layer
CTRL SHIFT J: Separates something into 2 different layers/Cuts them apart
CTRL T: Transforms an object (resize, rotate, moves)
CTRL D: Deselects an object (gets rid of marching ants)
CTRL S: Saves your image
CTRL Z: Goes back ONE step/Forward ONE step
CTRL ALT Z: Steps backwards

Thursday, October 8, 2015

Open your skull. Today we will:

Think about how you will achieve SYMMETRICAL and RADIAL balance in your skull
Learn to use CTRL ALT J to separate 2 layers
Learn to use a Gradient Fill to add dimension to our background
Highlight selected layers, right click, and select "Merge Layers" to combine several layers into one.

Wednesday, October 7, 2015

Look at the M:/ and select which skull template you want. Save a copy to your own folder.
Open your skull template in Photoshop.


We will be learning:
- Use CTRL J to duplicate your background layer
-Use paint bucket to color your skull and background using complementary colors
-Drag and drop one of your stock photos as a new layer in your skull
-Use the Move tool to position your object
-Use Magic Wand tool to delete the white background from your stock image object
-CTRL T to resize/rotate/flip your stock image layer
-CTRL J to duplicate your stock image layer (to create a second eye, for example)
 

Tuesday, October 6, 2015

Same Plan as yesterday. I only have about half of the class's contact sheets, so we can have today to finish them. Today will be the last day to work in class. Tomorrow we learn to select and cut in Photoshop.

I will introduce Brusheezy.com for those people who would like to move on to downloading and installing brushes.

Grades are updated! Check your Aeries!

Monday, October 5, 2015

TURN IN STOCK PHOTOS

Today we will finish editing our stock photos and turn in our contact sheet. Name your contact sheet Lastname_Firstanme_StockPhotos.jpg or something similar. The lastname_Firstname is the important part. Make sure to save your file as a JPG!


Steps for running a contact sheet, in case you forgot:
1. Click FILE--> Automate--> Contact sheet II
2. Click Files and Browse
3.Select the files you want to include by holding control and clicking each one you want.
4. Leave the middle section of the menu alone- you only change the bottom section.
5. Change the columns and rows setting to 5 and 8.
6. Click OK, and hands off! Let Photoshop run.

When you are finished...
The end of the quarter is around the corner. You can get 20 points of extra credit to pad your grade! Some of the ways you can get points, just to remind you:

-Visit APimages.com and browse their collection. Pick an image you like. Write a 1 page critique based on the elements of art. (We did this in class- it's easier than it sounds! Go through and discuss what textures you see, what kind of shapes are present, what forms are present, the color schemes used- if any, any leading lines in the photo, what kind of value the image has, and the photographer's use of space. Use your element book as a guide! Use those key words.)

-Play in Photoshop. It is always good practice. Make a collage page of something you like!
-Visit an art gallery and write a page on what you see. Literally describe what pictures you see, who the artist is, what you like or do not like, etc.
-Take extra photos or make an extra version of any project we do.

Friday, October 2, 2015

Friday: Basic Edits on Stock Photos

You will be performing basic editing on your 40 stock photos.

1. Crop out excess white from the background (do leave a little bit. See below)
2. Do the levels on your photos (Image--> adjustments--> levels, or CTRL+L)
3. Hit CTRL+S to save your Jpeg

GOALS!
1. Finish at least 40 edited stock images
2. Run a contact sheet with 5 cols and 8 rows (File--> Automate--> Contact Sheet II)
3. Save the contact sheet as LASTNAME_FIRSTNAME_stock images.jpg
4. Pick the skull you like from the M:/ and save it to your files

See example of yesterday's stock photo with basic edits, and the example of a completed contact sheet below:

Thursday, October 1, 2015

Stock Images

Today we spent the period taking stock photos of items which symbolize day of the dead, such as: flowers, fruits, candy, and other adornments for a face. Photos should be clear and centered on a white background, such as the example below.


 Take a shot of 50 different items! The more stock photos you have, the more options you have later.

Wednesday, September 30, 2015

Cameras!

Wednesday we got camera assignments and learned basic camera use. We covered:
-properly storing and holding the camera
-using the lens cap
-turning the camera on
-changing the batteries
-taking a picture
-viewing a picture
-deleting a picture

Tuesday, September 29, 2015

Day of the Dead sugar skulls

We want to start working on our Day of the Dead sugar skulls if we are going to have them on display for the holidays.

1. Do a google image search of Day of the Dead or Dia de los Muertos. Skim through the images there and pay attention to the patterns and colors used.

2. Open Microsoft Word. Open the two files I have left in the Miss E Folder. Save a copy of the Day of the Dead Info Sheet as well as the Day of the Dead Worksheet. Read this information on your own and complete the response questions 1-4.

3. Open this link: http://www.art-is-fun.com/day-of-the-dead/ and Open a new tab with this link: http://www.gotoquiz.com/day_of_the_dead_quiz
See if you can find all the answers to ace the quiz. Add your score on #5 of your worksheet.

Finished Project examples:


Monday, September 28, 2015

Basic Editing on Photos

Today we learned how to do the basic editing steps Miss E will expect.

ALL Photos need to have basic editing completed before turning in. The most basic requirements are cropping and levels. Cropping is something you should examine your image for, though you may not decide to crop. You MUST at least look at your image and ask yourself, "is there something I should crop out here? Is there some way my image would look stronger by cropping?" The levels of ALL photos need to be edited. No questions asked.

We learned:
  •  The Crop tool (and using the crop tool to straighten an image)
  •  Completing Levels
  •  Using the Hue & Saturation function to either boost your color or fade it
  •  Using the Black and White feature for a classic look
  •  Saving as a jpeg
  •  How to run a basic contact sheet

Friday, September 25, 2015

Elements "Quiz"

Complete the quiz inside the back cover of your Element Book. We are turning in Element Books today.

Thursday, September 24, 2015

Wednesday-Thursday we began learning Photoshop.
Click on the "Local Applications" folder, select the Adobe Design Premium folder, and double click either version of Photoshop to open.

Go to File-> New and enter an 8 x 10 inch, 300 resolution document.

We learned basic use of the Text Tool, Paint bucket tool, finding high quality source images using Google Image Search, pasting your image into Photoshop (CTRL+V), Transforming/changing the size of that image (CTRL+T), rearranging layers, naming layers, and deleting layers.

This 8x10 page has a photograph representing each element of art and a label expressing which element is represented. The document should be named Lastname_Firstname_elements.jpg

Tuesday, September 22, 2015

Critique Walk-through

Today I walked the class through writing their own 1 page critique based on the elements of art.

Monday, September 21, 2015

MONDAY: SUBSTITUTE assignment

Hi Guys! I am at an art teachers conference today. Your worksheet for the day is below. Just open it on your computer and complete #1-19 on your own sheet of paper, using your completed element books for answers.

Write in complete sentences.
This paper will be DUE to the sub at the end of the period.

When you get to #20, you will complete this in Word and save it on your computer. Read the directions carefully on #20. Remember:  To open WORD on your computer, you need to go to the same folder on your desktop where you open Powerpoint.

Friday, September 18, 2015

Friday! 9-18-15

Add 5 textures cut from magazines to your texture page.
Add at least one picture of a 3d object for form.
Beautify your book and add finishing touches. Make it look nice!
Add extra pictures for other elements if you have room.