Remember, you are running a 2 column, 5 row contact sheet, similar to the outdoor one. Finish your contact sheet today! Label your speeds and answer a couple questions anywhere on your sheet- Tell me:
1. What shutter speeds captured the best motion and the best lighting inside?
2. If I had to capture motion at 1/1000 of a second inside, what setting could I alter in my camera to get more light?
Tuesday, January 31, 2017
Friday, January 27, 2017
Remember, these shots should show ACTION! (Not just someone standing there)
1. Label your shots with the appropriate shutter speed. Remember, numbers are shown as FRACTIONS of a second unless they have quotations. That means they should be shown as 1/2000, 1/1000, etc.
2. Run a contact sheet that is 2 COLUMNS by 5 ROWS
3. In one sentance, somewhere on your contact sheet, tell me what shutter speeds worked best (caught the motion) and which did not work at all outside.
4. In a second sentence, predict which shutter speeds will probably do well indoors and why.

Wednesday, January 25, 2017
Tuesday, January 24, 2017
Did you get a good reflection shot? If not, go out for a while and try again. If so, do your editing! Crop out unnecessary areas/dead areas, and do your levels (Image-->Adjustments-->Levels) and adjust your image so you have nice contrast.
Just look at some of the best shots from yesterday!
Tip: Try flipping your image upside down for an extra effect


Just look at some of the best shots from yesterday!
Tip: Try flipping your image upside down for an extra effect


Monday, January 23, 2017
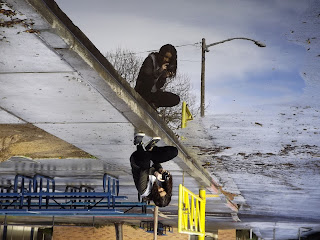
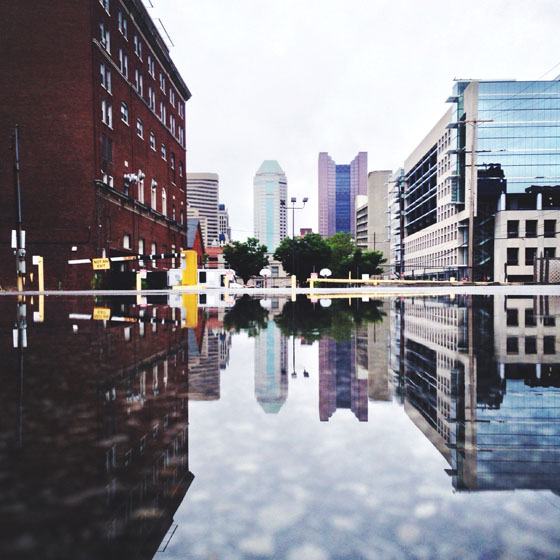
Reflection challenge!
Knowing what you do about ISO and Exposure compensation, I want you to go out and take advantage of all this water outside, and take the reflection challenge. Reflections can be hard- you really have to play with angles and set up your shot, whether it is a person, building, or object. Try to take as many as you can of all different things you can find. Check out some of these reflections I found online for inspiration:


Check your ISO and Bracket 1 stop up and one stop down!


Check your ISO and Bracket 1 stop up and one stop down!

Friday, January 20, 2017
Surveys
If you finish early, our principal and vice principal would like you to take these two surveys, regarding your opinion on your school facilities and technology :)
LCAP Survey: https://www.surveymonkey.com/r/TUSDLCAP2017
BrightBytes Survey: https://questionnaire.bbyt.es/campaigns/56a708078dba780668389075
ATTN PHOTO II: Your contact sheet will be 6 columns, 5 Rows, and check the box that says "across first" since you have extra exposures.
LCAP Survey: https://www.surveymonkey.com/r/TUSDLCAP2017
BrightBytes Survey: https://questionnaire.bbyt.es/campaigns/56a708078dba780668389075
ATTN PHOTO II: Your contact sheet will be 6 columns, 5 Rows, and check the box that says "across first" since you have extra exposures.
Thursday, January 19, 2017
1. Review your exposure worksheet with your camera partner. Check each others answers to determine if your partner's answers make sense as far as what you know to be true.
2. Find a suitable location to take a nice portrait of your partner. This is not simply a test shot- lets try to set it up and make it look GOOD. There are no bad models- only bad photographers! Here are tips I want you to use:

<------A. Shoot the face and body at an angle instead of directly in front for a flattering look. Shoot directly head-on for a more powerful, solid look. This is a good example.
*Shooting "down" at your model is also more flattering.
 <-----B.Get people and distracting things out of your background! Move around and angle your camera so you don't see them, or (if they're human) wait for them to pass.
<------C. Tell your model what to do so they don't stand there awkwardly. Remember, you are the director. You are in charge of the shot- not the model or the camera.
<----- D. Avoid "unwanted headwear"
E. Remember to bracket all 5 exposures for each pose. -2, -1, 0, +1, +2
F. Check your camera settings! Make sure the camera is in P Mode. Take a couple test shots to find the right ISO for the lighting conditions.
G. Take more than one set! 1 pose might end up looking better than the other.
H. Run a contact sheet that is 5 columns, 1 row. Crop it but leave room for labeling your exposures. Your sheet should end up looking like this:
2. Find a suitable location to take a nice portrait of your partner. This is not simply a test shot- lets try to set it up and make it look GOOD. There are no bad models- only bad photographers! Here are tips I want you to use:
<------A. Shoot the face and body at an angle instead of directly in front for a flattering look. Shoot directly head-on for a more powerful, solid look. This is a good example.
*Shooting "down" at your model is also more flattering.
<------C. Tell your model what to do so they don't stand there awkwardly. Remember, you are the director. You are in charge of the shot- not the model or the camera.
<----- D. Avoid "unwanted headwear"
E. Remember to bracket all 5 exposures for each pose. -2, -1, 0, +1, +2
F. Check your camera settings! Make sure the camera is in P Mode. Take a couple test shots to find the right ISO for the lighting conditions.
G. Take more than one set! 1 pose might end up looking better than the other.
H. Run a contact sheet that is 5 columns, 1 row. Crop it but leave room for labeling your exposures. Your sheet should end up looking like this:
Tuesday, January 17, 2017
Today we are going to work on answering these questions:
Open a new Word document and copy/paste the following 10 questions:
1. Review: What does ISO control?
2. Review: What is the negative side to raising your ISO?
3. What is exposure?
4. What does "overexposed" mean? [INSERT PHOTO]
5. What does "underexposed" mean? [INSERT PHOTO]
6. What is exposure compensation?
7. What is a "stop?"
8. What does the exposure compensation button look like on most cameras? [INSERT PHOTO]
9. What is bracketing? [INSERT PHOTO]
10. Give me an example of a situation where I might have to adjust my exposure?
11. Click the link for the camera simulator below. What exposures work for the first photo?
12. What exposures work for the second photo?
13. Insert your bracketed partner portrait.
Here are links to 3 YouTube videos to help understand exposure for those of you watching at home:
What is exposure?
Understanding exposure
Exposure bracketing
Next, we are going to try the camera simulator to experiment with exposure:
Camera simulator
Finally, we are going to go outside and take the SAME portrait of our partner, at -2 stops, -1 stop, 0, +1 stop, +2 stops

Tuesday, January 10, 2017
National Geographic is also an excellent resource for critiquing images!
http://www.nationalgeographic.com/photography/best-of-2016/best-photo-of-the-day-national-geographic/
http://www.nationalgeographic.com/photography/best-of-2016/best-photo-of-the-day-national-geographic/
Monday, January 9, 2017
1-9-2017 Sub Day
1. On Friday we wrote most of the critique together, but we did not finish the last 3 paragraphs. I would like you to finish the last 3 paragraphs on your own. Then, you will have your partner proof-read your critique and check for the following elements. Once your partner has given your critique a second read, you can turn your word document in to the turn-in folder.
2. After you turn in your personal critique, you and your partner will look at images together and decide on an image to critique together. You will discuss the image and draft a full critique together. Make sure you discuss each element thoroughly! You do not have to finish the partner critique today.
Here is the guide:
The powerpoint we saw Friday is also on the M-Drive in the Miss E folder
In this critique you will go through all seven elements of art and
include your opinion on the piece. Here is how your critique should break
down:
Paragraph 1: Introduce your picture’s name, artist, and
year, and any other information you have about it. Describe what your
picture shows in as much detail as you can.
Paragraph two: Describe the use of color in
your picture. What colors do you see? Do the colors suggest any specific
feeling? You must state which color scheme the artist is chosen, if any. Common
color schemes are: complementary, analogous, primary, monochromatic,
achromatic, and neutral.
Paragraph three: Describe use of line in your
image. Are there any leading lines? Other strong horizontal or vertical?
Perhaps a horizon line?
Paragraph 4: Describe the use of space in your photo.
Does your picture have shallow space or deep space? Do you have lots of
positive space or lots of negative space?
Paragraph five: Describe the use of value in
your image. Do you have mostly light values or dark? Do you have many middle
grays or is your image high contrast with very few mid tones? Does the
lightness or darkness of the photo suggest a mood or emotion? (Remember, color
has value, too!)
Paragraph 6: Describe the use of texture in your photo.
Texture adds interest and enriches a photo. What sort of textures has your
artist used to draw that you were in. Do those textures communicate a mood or
feeling?
Paragraph 7: Describe the use of shape in your photo.
Remember shape is 2D and flat. Are there more organic shapes, more geometric
shapes, or a mix of both? Identify each in your photo.
Paragraph 8: Describe the forms in your image. Remember
forms are 3-D. If you can hold it in your hand it is a form! Forms can be
either geometric or organic. Identify the geometric and organic forms in your image.
Paragraph 9: Finally, discuss your personal feelings on the image.
Describe what you'd like and don't like about it. Describe how you interpret
the feeling and subject matter (what emotions or message do you think is
there?) Give your overall opinion on why.
Wednesday, January 4, 2017
Welcome back!
We are going to have a critique week! This means we are going to be doing a lot of writing about photographs using our elements of art. Unfortunately, we haven't discussed elements in 3 months. Today you are going to create a new document in Microsoft Word.
Using Google and Word, I would like you to create a journal entry which includes the following elements of art vocab, with the meaning and a visual example. This will be your cheat sheet as you critique photographs in the upcoming week. Remember, this is a guide to help YOU. Simply cutting and pasting a definition you do not understand will not help you. If one definition you find is too complex, keep looking until you find one that makes sense to you.
1. complementary colors
2. analogous colors
3. primary colors
4. monochromatic colors
5. achromatic colors
6. neutral colors
7. horizon line
8. leading lines
9. shallow vs. deep space
10. positive space
11. negative space
12. value
13. contrast
14. texture
15. shape vs. form
16. organic shape
17. geometric shape
18. organic form
19. geometric form
20. look for, and insert a photo you would like to critique
http://www.apimages.com/ or search "famous photographs"
Subscribe to:
Posts (Atom)