Wednesday, December 14, 2016

Adjustment layers

You can edit all the frames in your GIF at once by using adjustment layers. Adjustment layers give you all the classic edits like levels, hue/saturation, color balance, exposure, etc, in a convenient layer that sits on top and affects all the layers below it. Look right above your layers palette for the menu that looks like this, full of symbols:
Run your mouse over each one to see what that icon represents. MAKE SURE YOUR LAYERS ARE ALL TURNED ON. Check your "little eyeballs" on each layer. The adjustment won't take effect in a frame of your animation if that layer is turned off.


****Don't forget to resize your GIF****

1. Click   Image--> Image size
2. Change "pixels" to "percent"
3. Enter a suitable percentage size (Hint: What size are you viewing at in Photoshop??)
4. Click OK

Thursday, December 8, 2016

GIFs

Here's the link to the tutorial I followed for today's demo.
http://www.tech-recipes.com/rx/32891/photoshop-create-a-gif-file/
 It is pretty good- it has lots of pictures to show you where to click- but he skips a few important things:

1. Crop, resize, and edit your image AFTER you "Load Files into Stack" but BEFORE you use Timeline to create frame animation.

2. Make sure that your Timeline says "Create frame animation" in the middle when you open it-
   NOT "CREATE VIDEO TIMELINE". If it says "create video timeline", use the drop-down arrow next to it to change it.

3. BEFORE step 6 (where you open the menu and click "Make frames from layers") you MUST CLICK "Create frame animation" on the main timeline. See below:

Tuesday, December 6, 2016

Tuesday 12/6 Substitute

Hello again guys,
I'm still ill, but I have an interesting video for you guys about the history of animation which ties into our GIF making process.

SUBSTITUTE: After students have had 7 minutes or so to read the blog and set up their WORD document, Please play the following video on the projector from either youtube or cleanvideosearch, whichever will open.
http://cleanvideosearch.com/media/action/yt/watch?videoId=Sfzy05M-nzY
https://www.youtube.com/watch?v=Sfzy05M-nzY


STUDENTS: Open WORD and copy the following list and look over the terms.  Pay special attention to these terms because you will explain what these things are, or what they were significant for by the end of class. Note you will have extra time at the end, so you will be able to get onto Google if you did not catch a definition.

0. EXAMPLE: What is cel animation? Cel animation means every frame is drawn by hand.
1. 1609- What was the "magic lantern"?
2. 1800s- Thaumatrope?
3. 1800s- Zoetrope?
4. Gertie the Dinosaur was the first...?
5. 1928- Steamboat Willie was the first?
6. What happened in 1929?
7.  What happened to animation as a result of #6?
8. 1937- Snow White was the first?
9. What is "rotoscoping"?
10. What is FPS?
11. What is CGI?
12. Claymation?
13. 2009- Avatar was the first...?
14. 1988- Akira was the first?
15. By now, in 2016, is "cell animation" dead?

Please change your answers to a different color, or bold them. Save your WORD file as lastname_firstname_animation.doc

Monday, December 5, 2016

Substitute Monday 12/5/2016

Hello to sub and students,
I am sick today so I am leaving you with a video about Eadweard Muybridge. You need a piece of paper- You will watch the movie and collect 15 facts that stand out to you. The notes will be due at the end of the period.

These are both the same video, one linked to youtube and one to the district's clean video search.
You can't open them on the school computers but the substitute can on the projector.
http://cleanvideosearch.com/media/action/yt/watch?videoId=5Awo-P3t4Ho
https://www.youtube.com/watch?v=5Awo-P3t4Ho&t=1178s


Friday, December 2, 2016

Today's Agenda

Eadweard Muybridge Video on Youtube
Eadweard Muybridge's Zoopraxiscope
Here are two important videos for those people watching at home.

1. Today, you will finish your 8x10 300 resolution notes page on Eadweard Muybridge and turn it in.

2. Then, you and your partner will brainstorm and log 6 ideas each. Come up with 3 ideas involving people and 3 ideas involving objects. They don't have to be great ideas, just any ideas. The goal is to have a plan when you go outside.

3. You will go out and begin shooting when you have finished the above.
 TIPS for shooting GIFs:
--You MUST use a tripod
--Start with moving objects instead of people
--Think about how it is going to loop, meaning your model/item has to end in the same place it began

Thursday, December 1, 2016

Yesterday we turned in the 2 Bursting Color photos PLUS the contact sheet of our source images. Remember, the last day I will accept your bursting color photos is Wednesday, Dec. 7th.

Today we will look again at Edweard Muybridge and begin to create our own animated gifs! We will be creating cinemagraphs- similar to the photos on http://cinemagraphs.com/ and https://flixel.com/cinemagraphs/


Monday, November 21, 2016

Today we are taking photos for our Bursting Color project.
On a side note, I know some of you are looking for jobs, and I saw this sign at Mongolian BBQ yesterday--

Friday, November 18, 2016

Overcoming Boundaries

We will be creating the following images featuring a subject bursting out of a colorful box into a black and white world. We will focus on one plant based subject and one human subject. Here are some great student examples, followed by the links to the video tutorial we watched in class and source images to complete the practice "yellow flower". Complete the practice successfully before moving on to your original work!


 Here are the LINKS to the Raul Fernandez  tutorial videos:

PART 1: https://www.youtube.com/watch?v=g6E_MT715bo

PART 2: https://www.youtube.com/watch?v=j7l1pM3LQ7g


 Here are the source images for your trial run:


Tuesday, November 15, 2016

***Our end goal is 3 SUCCESSFUL panoramas (no major issues like floating body parts). 1 landscape, 1 repeating partner photo (try for at least 5!), 1 interesting/creative challenge.

***See the full editing details on the M:/ But basically, once all other edits are complete, you will:
1. Add a border to your jpg by clicking Fx and "stroke". Select the color border you want. Change "outside" to "inside". Increase the line width slider until you like the result.

2. Click Image-->Image size. Change "pixels" to "percent". Type 20 and click ok. This will greatly reduce the size of your file. Save as a JPEG with your last name first.

3. Name your files
Lastname_firstname_panorama1.jpg
Lastname_firstname_panorama2.jpg
Lastname_firstname_panorama3.jpg

4. Place your 3 completed panoramas in the correct period turn-in folder.

Tuesday, November 8, 2016

PANORAMA

We will spend the next 3 days doing Panoramic photos.
pan·o·ram·a
ˌpanəˈramə,ˌpanəˈrämə/
noun
  1. You will take a series of images which overlap slightly at the edges. 
  2. You will open Photoshop and click File-->Automate-->Photomerge
  3. Select your files to merge. Click OK. Photoshop will weave your photos together into one long panorama. 
  4. Crop the ragged edges and follow the editing directions on the M:/


Monday, November 7, 2016

Run your rule of thirds photos in a contact sheet that is 3 COLUMNS by 4 ROWS. Remember not to touch the height and width column. Save as JPEG.  Select your BEST PHOTO and submit that in the turn-in folder as well.

If you finish early, pick a tutorial:
 

OR, if you have headphones, pick a video tutorial from the M:/

Thursday, November 3, 2016

Editing in Camera Raw mode

Editing in camera raw: Camera raw is a really huge file format that most professional photographers use. We can "trick" Photoshop into thinking our JPGs are RAW files and edit them using the camera raw menu.

1. Click File--> Open As...
2. Select Camera Raw in the drop-down menu
3. Select the photo of your choice and click Open
4. Use the different sliders to edit specific aspects of your image. Play around with each slider to see its effects.
5. When finished, click Open Image. Your image will appear in your normal Photoshop window.
6. Proceed with editing, cropping, etc. as you normally would, and save your image as a JPG.

Wednesday, November 2, 2016

Rule of Thirds

We will watch the following video just to see some more examples of Rule of Thirds in action:
http://cleanvideosearch.com/media/action/yt/watch?videoId=Vzx1kZUb5SM

Using the Rule of Thirds, take the following 12 photos AT LEAST (more is always better!)
-3 People
-3 Objects
-3 Landscapes
-3 of anything you choose

Next, we will begin basic editing on our photos.
CROP: Bring up the crop tool with the grid to make sure your SUBJECT (the main place you want the viewer to look) is on a CRISS-CROSS of the grid.
LEVELS: Check your levels by clicking Image-->Adjustments-->Levels or CTRL+L
MORE: Would the image be better Black and White? Sepia toned? Adjusted Hue/Saturation?

PHOTO II- Pick a portrait you took. Closely watch and follow along with this video, which builds upon the camera Raw mode: http://cleanvideosearch.com/media/action/yt/watch?videoId=wSR5QsbfCIA


Friday, October 28, 2016

Viewpoints due!

VIEWPOINTS CONTACT SHEET AND BEST PHOTO DUE TODAY!

Put your JPG contact sheet and best photo both in the viewpoints contact sheet folder.

Thursday, October 27, 2016

Viewpoints contact sheets

1. Make sure your photos are named correctly (see post 2 days earlier)
2. Run your contact sheet to have 3 columns, 5 rows. 
3. Save it as a jpg, named Lastname_Firstname_viewpoints_contact.jpg
4. Drop it in the correct turn-in folder
5. Select a tutorial to complete for extra credit at one of the following sites:

*** Remember, you must be working on photography related tasks all period. Even if you are finished early, you need to be pushing your knowledge and practicing in Photoshop. Photography is like a sport or musical instrument- you only get better by DOING it.***

Example of a finished viewpoints contact sheet:


Wednesday, October 26, 2016

Before and after editing from Juan

If you are finished editing, you can run a contact sheet with 3 columns and 5 rows
Save as JPG and name your sheet Lastname_Firstname_viewpoints_contact.jpg


Tuesday, October 25, 2016

5 best views

Remember you are choosing YOUR 5 best birds eye, 5 best worms eye, and 5 best tilt photos.

You must have your OWN set- no sharing images. And if YOU are in the picture, and it's not a selfie, then you are not the photographer. You can still edit pictures your partner took of you for your own practice and enjoyment, but you can only turn in pictures where YOU were the photographer.

Editing makes a difference- look at the same photo, edited 4 different ways:

1. Original photo 2. Black and white with warming filter  3. Vintage faded   4. High contrast high saturation

Editing can be the difference between an average photo and an eye-catching photo. Check out Juan's before and after photos below:

Monday, October 24, 2016

Today you will begin editing your photos by doing your cropping, levels, and naming. Pick your 5 best birds, your 5 best worms, and 5 best tilt for editing.
birds_1.jpg
birds_2.jpg
birds_3.jpg etc.
worms_1.jpg
worms_2.jpg etc.
tilt_1.jpg
tilt_2.jpg

We will review those common mistakes beginners make first, then look at the best ways to crop our photos. Then we will play around with different basic editing effects.

Remember, you can get to levels with CTRL-L or IMAGE-->Adjustments-->Levels

Hue and Saturation is IMAGE-->Adjustments-->Hue/Saturation
You can turn saturation down for a faded, vintage look

You can try IMAGE--> Adjustments--> Black and White for a classic look

You can play with IMAGE-->Adjustments-->Brightness contrast for a high powered punch


Thursday, October 20, 2016

We don't want to start editing until we can fully, safely save our files, so we will go out for more viewpoints photo challenges! Today you will try to get all 3 creative viewpoints of...

*Lockers
*Some kind of architecture/building
*A doorknob
*A leaf
*A flower
*Something red

Remember... be artistic and creative! Try to get a shot that someone will want to look at again. Try to get a shot that, with a little editing, can end up as good as some of these past student examples:

Worms eye lock (object you choose)
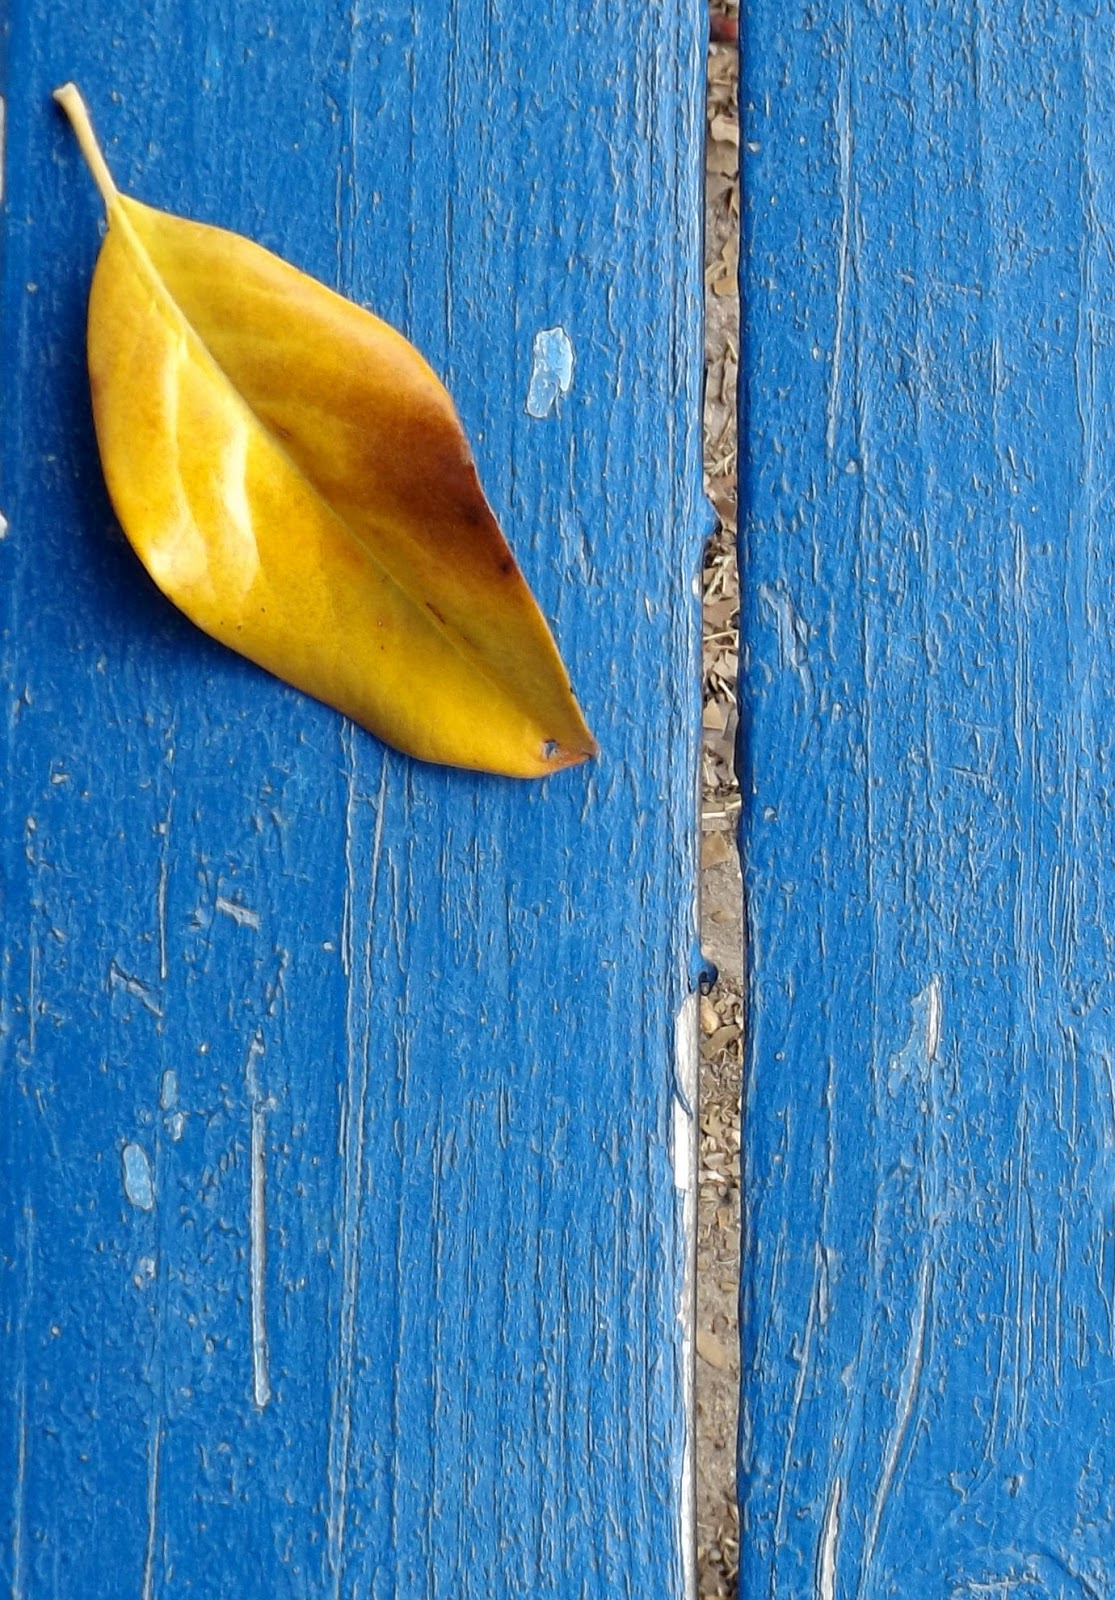
Birds eye leaf

Worms eye portrait

Tuesday, October 18, 2016

Photograph each subject in BIRDS EYE, WORMS EYE, and DUTCH TILT:

*Person
*Car/part of a car
*Shoe
*Tree or flower
*Camera
*Water bottle or cup
*Yourself
*Your choice


Remember… We are trying to be artistic and creative. Try to do something DIFFERENT.

Examples of creative birds eye  portraits:


Monday, October 10, 2016

Helpful hints

Today we continue working on our skulls. Remember:
-Use both radial balance and symmetrical balance (see last post)
-Use a complimentary color scheme (red/green, blue/orange, yellow/violet)
-Use brushes and stock photos equally to decorate your skull
-Fill the skull completely.

Shortcuts:
CTRL-J : Duplicates a layer
CTRL - SHIFT - J : Cuts something into it's own layer
CTRL - T : Transforms a layer (resize, flip, rotate)
CTRL - ALT - Z : Undo
CTRL - SHIFT - I : Inverts your selection
CTRL - D : Deselect

To RUN A CONTACT SHEET:
1. Put all your finished PNGs into one folder
2. Open photoshop and click FILE--> Automate--> Contact sheet II
3. Choose your folder at the top by choosing "browse"
4. In the BOTTOM section where it says "columns" and "rows", enter 5 cols and 10 rows
5. Click OK and hands off! Let photoshop do its thing.
6. Save as JPG and drop into the turn-in folder

Tuesday, October 4, 2016


Open the Miss E folder on the M:/
Select which skull template you would like to use and open it in photoshop.
Select the color scheme you would like to use.

As you design your skull, you will show evidence of using 2 types of balance: Symmetrical balance, and radial balance. Symmetrical balance means both sides are mirror images of each other. Radial balance means your elements come from a central point and "radiate" out in a circle.

Symmetrical balance in a photograph

Radial balance in a photograph


Monday, October 3, 2016


Photo I: Continue editing your stock photos. You should have anywhere from 60-100+ stock photos from the last few days of shooting. After editing, I would expect that you have about 50 usable stock PNG files.

Photo II: Today is great lighting to take your selfie! Remember to crop in close to your face- even closer than my examples. You should have finished your stock photo edits and basic self portrait by today.

Photo II: Here is my original, basic selfie (top), an example of A work (middle), and an example of average work (bottom).

Thursday, September 29, 2016

WE ARE AIMING FOR 50 EDITED PHOTOS per partner pair

Today we will be editing our collection of stock photos. See the before and after photos to the right.

First, look through your photos and delete anything that is BLURRY or cut off on the edges.

Next, open a stock image and double click the layer to unlock it.

1. Press C to open the crop tool. Take off any excess white.
2. Press SHIFT-CTRL-B to auto correct color.
3. Press CTRL-L to open Levels and make adjustments to contrast/white balance.
4. Use magic wand or quick select to select the white background.
5. Click "Refine Edge". Adjust the "Smooth" slider to eliminate ragged edges. Click OK.
6. Press backspace to cut the white background.

We will be saving these as a PNG file this time- not a JPG. PNG keeps your background clear, allowing you to use the image almost like a sticker.


Monday, September 26, 2016

Creating stock photos for sugar skulls

You are going to begin taking stock photos of all different flowers, candy, and fruit for your Day of the Dead Skull. Remember, use a plain white background when possible, unless your object is white or very light in color.

Review your camera procedures!
-how to carry the camera
-how to remove and replace lens cap
-how to clean the lens
-how to remove and replace batteries
-basic camera functions
-uploading to computer

For this period, your goal is to shoot as many objects as you can. The more you take now, the more you have to choose from later when you decorate your skull. Try to get EVERY object!

Remember to photograph the whole object, 1 at a time, like the examples shown. Do not let pieces of the object get cut off at the edge.

Create a new folder inside Quarter 1, named "Stock Images". Upload your stock photos (each partner) at the end of class.


Thursday, September 22, 2016

Read and review: Day of the Dead...Sugar skulls are coming!

Day of the Dead artwork is not meant to be scary. Just the opposite - this artwork is meant to celebrate the spirit and honor the memory of those who have passed. Day of the Dead is known as "Dia de los Muertos" in Spanish. It is a Latin American holiday falling on November 1 and 2 of every year. On these two special days, Latin American families and friends gather to celebrate, honor, remember and pray for their departed loved ones. November 1 honors departed children and November 2 honors adults.
Day of the Dead art is alive with smiling skulls in kaleidoscope colors, full of decorative and detailed designs. It is a vibrant art of colors and chaos. Look at the skull art on this page. What do you see: evil skull drawings or benevolent beings? Sweet or sinister smiles? The answer may depend on how you interpret death.


To celebrate the deceased is to accept that death is an inevitable part of life. Life and death are two sides of the same coin - life cannot exist without death, and vice versa. Plans for the day are made throughout the year, including gathering the goods to be offered to the dead. During the three-day period families usually clean and decorate graves;[2] most visit the cemeteries where their loved ones are buried and decorate their graves with ofrendas (offerings), which often include orange Mexican marigolds. These flowers are thought to attract souls of the dead to the offerings. Families will also offer trinkets or the deceased's favorite candies on the grave. The intent is to encourage visits by the souls, so the souls will hear the prayers and the comments of the living directed to them. Celebrations can take a humorous tone, as celebrants remember funny events and anecdotes about the departed.
Some families build altars or small shrines in their homes. These altars are decorated using sugar skulls, marigolds, candles, Christian crosses, images or statues of the Virgin Mary, and photos of the departed, as well as their favorite foods and beverages.
       

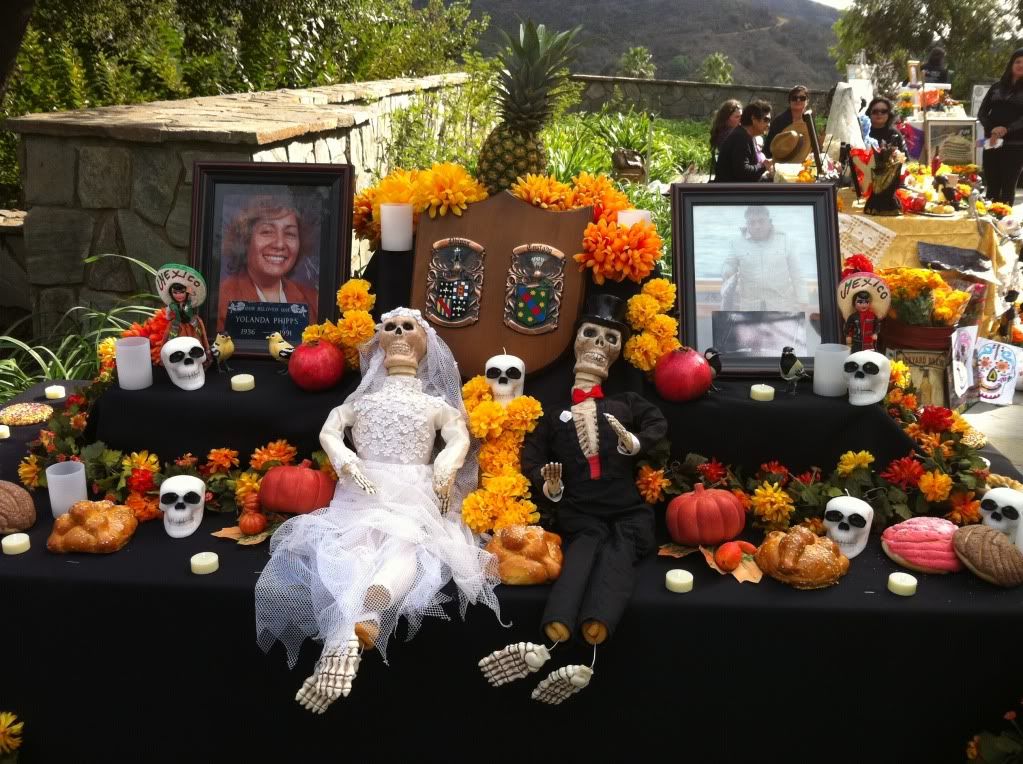
Skulls (known as calaveras) are ubiquitous in Day of the Dead  celebrations. They are the ultimate symbol of mortality. Underneath our fleshy exterior, our very earthly existence depends upon this skeletal foundation. Therefore Day of the Dead art revolves around imagery of skulls and skeletons in many states and forms: dancing, cooking, smiling, and playing banjo, for example. The belief is that our personalities and identities carry on into the afterlife. So when a person buys an image or statue of a skeleton baking bread and places it on an altar in honor of their aunt who was a baker, the image is said to help the dead soul find her way back to the altar where she can commune with her relatives. This is why there are numerous depictions of skeletons engaged in various specific activities. Skulls will be made from foods such as chocolate or sugar and decorated with bright colors. Sugar skulls as gifts can be given to both the living and the dead.  Day of the Dead artwork is often colorful and lively, sometimes whimsically macabre. Day of the Dead art is ironically full of life. To those of us who did not grow up in Latin American culture, Day of the Dead art rejuvenates our common Western perception of death by presenting a view of the afterlife that is full of energy and spirit, worthy of joy and celebration. It brings with it the hope that after death, there will still be another tomorrow.

ANSWER THE FOLLOWING IN  A WORD DOC:

 1. List 3 things you learned that you did not know about Day of the Dead before:
-
-
-


2. How would you summarize this holiday?

3. How do you feel about celebrating death this way?

4. List all the symbols (or items) you can find in the text which are associated with this holiday:


5. How does the Day of the Dead compare and contrast to the American holiday of Halloween? 

Wednesday, September 21, 2016

Good morning everyone! Again, I cannot make it today. Your options for today are:

1. Finish your main name banner if you haven't, and save it as Lastname_Firstname_Banner

2. Continue on to create a 2nd banner for extra credit. This can be someone else's name that you know, or even a collage for your favorite musician/TV show/ food/ whatever.

3. Play around with this graffiti text creator to create an interesting, custom name for yourself. Make sure to try all the features like changing colors, outlines, patterns, etc. SAVE IT FOR EXTRA CREDIT. 

----> http://www.graffiticreator.net/  <------

Think you're a PRO? Import your graffiti name into Photoshop, and give it a custom background layer like a brick or cement wall. 


****Remember, when I am gone, you may need to rely on your neighbors to help you when you get stuck. Ask your row mates next to you. Don't be afraid to say, "Hey, how did you change color on your letters?" or "Can you see what I'm doing wrong? This isn't working".

Tuesday, September 20, 2016

Good morning everyone,
Sorry I couldn't make it today. You are finishing up your name banners. Remember, they should be FULL and properly cut. Add layer styles (the little fx button) if you haven't already.

Name them Lastname_firstname_banner and tomorrow I will show you how to save them correctly. You can always start another extra credit banner! Follow these steps:

Click File--> new.
Change "pixels" to "inches"
Type 10 width, 4 height, and 300 resolution.
Create a banner for any theme you want!

Friday, September 16, 2016

Work on your name banners :)   :)    :)

Here are a few examples of A+ work:


Measurements are 10" width, 4" height, and 300 resolution

Tuesday, September 13, 2016

Open Photoshop.
Click File-->Browse in Bridge
Open the PUZZLE jpg from the Miss E Folder

You can also use this girl in the blue dress as a guide.

Using your rectangular marquee tool, copy and paste the pieces into the proper spots.