Today you will be taking pictures of differing viewpoints and angles.
You will need each of the 4 viewpoints (Worms Eye, Birds Eye, Eye Level, Dutch Tilt) of one man made object, natural item, one person, and a landscape.
So you will need a man made object at worms eye, birds eye, eye level, and tilt.
So you will need a natural object at worms eye, birds eye, eye level, and tilt.
So you will need a person at worms eye, birds eye, eye level, and tilt.
So you will need a landscape at worms eye, birds eye, eye level, and tilt.
Remember to use your RULE OF THIRDS as well! We are building all these techniques together.
Remember to make it look artistic. Plan your shots.
Friday, October 30, 2015
Thursday, October 29, 2015
Thursday
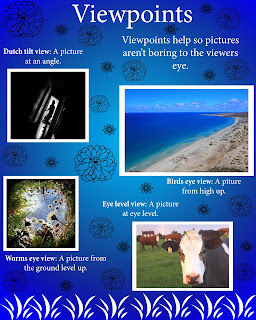
Yesterday I gave feedback on contact sheets and had people change certain pictures and re-shoot. Today we will be creating an info-graphic on Viewpoints, since that will be our next topic.
Viewpoints is all about getting different camera angles so your work doesn't become boring and predictable. Learning to see the world from all different angles and viewpoints is important for any artistic photographer.
 1. Open a NEW document in Photoshop named lastname_firstname_viewpoints
2. Change pixels to INCHES, and enter width: 8, height: 10
and resolution: 300
3. Title your page VIEWPOINTS. Somewhere on the page, tell in a complete sentence
why we should change our camera angle sometimes.
4. Open Google. Look up birds eye view, worms eye view, eye level camera angle, and
dutch tilt
5. Provide a definition and a photo example for each
6. Make it look nice
Monday, October 26, 2015
Tuesday- Sub Day
Good morning ladies and gentlemen!
I am at an Adobe Photoshop Users conference today, learning more rad stuff to teach you guys.
You will be finishing your edits, renaming your photos, and running your contact sheets as per the instructions yesterday. I created turn-in folders, so you may turn in your contact sheets if you are finished.
When you finish, there is a paper on the counter for you. You will go through your contact sheet picture by picture and ask yourself some questions about each picture. I filled some example slots out for you. If you need more examples about what is considered artistic, look at yesterday's contact sheet. All of these pictures show forethought and effort. When you finish with this grading sheet, turn it in to the basket with your NAME and PERIOD on it.
If you finish early, you may go take extra photos demonstrating your knowledge of the rule of thirds. You can edit and contact sheet these for extra credit points toward quarter 2.
See you Wednesday!
1. Finish editing all of your 12 rule of thirds photos. See Friday's entry for some extra tips on editing.
2. Rename your photos as such: (you can do this pretty quickly at the end, after you've completed all your edits)
portrait1.jpg, portrait2.jpg, portrait3.jpg
landscape1.jpg, landscape2.jpg, landscape3.jpg
object1.jpg, object2.jpg, object3.jpg
whatever1.jpg, whatever2.jpg, whatever3.jpg
3. Run a contact sheet containing all 12 of your images by clicking File--> Automate--> Contact sheet II. Select what files you want in the 1st section of the contact sheet menu. Leave the middle section alone! Change the bottom section where it says "columns" and "rows". You want 3 columns and 4 rows (because you have 12 pictures, and 3 x 4 = 12)
4. Name your contact sheet LASTNAME_FIRSTNAME_thirds.jpg
Here is a finished example containing some of my best rule of thirds photos by students:

Friday, October 23, 2015
You should be done taking your 12 Rule of Thirds photographs. Now you will start doing your basic editing: Cropping and levels. Remember, you can use black and white if you choose (Image--> adjustments--> black and white). You can adjust little things like Hue/Saturation and Brightness/Contrast but remember that the pictures should look natural. You don't want them to look fake and photoshopped.
Thursday, October 22, 2015
Camera Rules
There are a couple simple rules which dictate our conduct when taking photos around campus:
1. Do not run or speak loudly near classrooms or rally court. Other classes are in session.
2. No groups. Stay with your partner ONLY.
3. No sitting outside, unless you're modeling for someone.
4. Do not leave campus. If we walk to the park, we go as a class.
5. NEVER enter a classroom without prior written permission from the teacher. NEVER. It does not matter if you're their favorite/T.A./cousin/neighbor/whatever. Do not interrupt classrooms.
6. Treat your camera like it's your baby. Wear your neck strap.
Next, there are a couple common problems with peoples photographs:
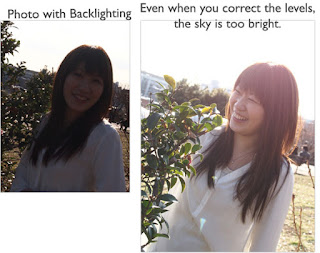 1. Stay out of the direct sunlight. It usually causes problems like harsh shadows and backlighting. Be careful of backlighting! Whenever you pose your person in front of a bright sky or window, look what happens.
2. Be selective and choosy about your photos. I want them to look like something artistic that you planned. They should not feel like a snapshot you took while just walking around.
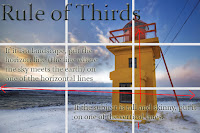
3. Remember to use the rule of thirds! Do NOT center your subject.
1. Do not run or speak loudly near classrooms or rally court. Other classes are in session.
2. No groups. Stay with your partner ONLY.
3. No sitting outside, unless you're modeling for someone.
4. Do not leave campus. If we walk to the park, we go as a class.
5. NEVER enter a classroom without prior written permission from the teacher. NEVER. It does not matter if you're their favorite/T.A./cousin/neighbor/whatever. Do not interrupt classrooms.
6. Treat your camera like it's your baby. Wear your neck strap.
Next, there are a couple common problems with peoples photographs:
 1. Stay out of the direct sunlight. It usually causes problems like harsh shadows and backlighting. Be careful of backlighting! Whenever you pose your person in front of a bright sky or window, look what happens.
2. Be selective and choosy about your photos. I want them to look like something artistic that you planned. They should not feel like a snapshot you took while just walking around.
3. Remember to use the rule of thirds! Do NOT center your subject.
Wednesday, October 21, 2015
Grab a piece of paper and answer the following: (HINT: It follows the Powerpoint from yesterday, accessible on the M:/)
When you are finished, you can turn your paper in to the basket on the counter, and go take pictures according to the Rule of Thirds. Your goals are to get all of the following
1. What is the “subject” of a
photograph?
2. What is “composition”, basically?
3. What is the “rule of thirds”?
4. Where should you place your subject
on the grid?
5. What is the point of using the rule
of thirds?
6. Where should the horizon line be in a
landscape photo?
7. Where on the grid should we place
someone’s eyes?
8. How do I get the grid to show on my
camera?
9. If I forgot to use the rule of thirds
when I took my picture, what tool can I use in Photoshop to fix it?
10. How
do I find out what I missed when I’m absent??
•3 portraits (photo of a person)
•3 landscapes (a view of the land from afar)
•3 objects
•3 of anything you want
•3 landscapes (a view of the land from afar)
•3 objects
•3 of anything you want
Tuesday, October 20, 2015
Rule of Thirds
Today we are beginning to focus on composition- in particular, the rule of thirds.

- You will have 10 minutes or so to finish up reflection sheets from yesterday.
- We will watch a short powerpoint presentation (accessible on the M:/ if you were absent) on the rule of thirds.
- You will practice cropping several photos according to the rule of thirds.
- You will go out and take several portrait photos using the grid on the camera to help you align your subject according to the rule of thirds.


Monday, October 19, 2015
Finish sugar skulls today!
Today is the last in class workday for skulls!


- Try adding drop shadows to your items by clicking the "Fx" button at the bottom of the layers palette. See the difference drop shadows make below.
- When you finish your skull, save your file as LASTNAME_FIRSTNAME_skull.jpg
- Remember to change both the file extension (.jpg) and the drop-down menu to JPG. CHECK your file to make sure it will open from the turn-in folder, and that it is not broken.
- Get a reflection sheet off the counter and fill it out thoroughly and completely. I want at least a couple complete sentences for each question. BE DESCRIPTIVE.
- Turn your reflection sheet into the basket on the counter.


Friday, October 16, 2015
Thursday-Friday
Lets finish up skulls today, if we can.
Here is an example of the grading sheet I will be using to evaluate your work. Open your skull and go through each category, scoring yourself. What did you get??
When you are finished, download the reflection sheet from the Miss E folder and fill it out. We will be turning it in with our skull.
I am already seeing some great things! Check out Natalie and Alicia's awesome work:


Here is an example of the grading sheet I will be using to evaluate your work. Open your skull and go through each category, scoring yourself. What did you get??
1. Is
it finished (full)? _________(10)
|
2. Is
the face Symmetrical? ___________(10)
|
3. Is
radial balance used? _____(10)
|
4. Did
you use complimentary color? _____(10)
|
5. Did
you use traditional symbols of Day of the Dead? _________ (10)
|
6. Overall
creativity _____(10)
|
TOTAL SCORE: ___________ (70)
|
When you are finished, download the reflection sheet from the Miss E folder and fill it out. We will be turning it in with our skull.
I am already seeing some great things! Check out Natalie and Alicia's awesome work:


Wednesday, October 14, 2015
Skull Day
Today we are working on skulls.
Here is a tip: As you begin to fill your skull, you can use this technique to fill empty spots without making the skull look too confusing or cluttered. Color match your "skin" color, or face color. Then make the color slightly darker or slightly lighter using your color picker menu. The effect will look something like this:


Here is a tip: As you begin to fill your skull, you can use this technique to fill empty spots without making the skull look too confusing or cluttered. Color match your "skin" color, or face color. Then make the color slightly darker or slightly lighter using your color picker menu. The effect will look something like this:


Tuesday, October 13, 2015
Monday, October 12, 2015
Good Morning! Happy Monday!
CHECK YOURSELF: Did you use a complementary color scheme? Is your skull symmetrical (same on both sides)? Did you use RADIAL balance somewhere (circular design)?
QUIZ TOMORROW on the following shortcuts!!!!
Remember:
CTRL J: Copies a layer
CTRL SHIFT J: Separates something into 2 different layers/Cuts them apart
CTRL T: Transforms an object (resize, rotate, moves)
CTRL D: Deselects an object (gets rid of marching ants)
CTRL S: Saves your image
CTRL Z: Goes back ONE step/Forward ONE step
CTRL ALT Z: Steps backwards
Thursday, October 8, 2015
Open your skull. Today we will:
Think about how you will achieve SYMMETRICAL and RADIAL balance in your skull
Learn to use CTRL ALT J to separate 2 layers
Learn to use a Gradient Fill to add dimension to our background
Highlight selected layers, right click, and select "Merge Layers" to combine several layers into one.

Think about how you will achieve SYMMETRICAL and RADIAL balance in your skull
Learn to use CTRL ALT J to separate 2 layers
Learn to use a Gradient Fill to add dimension to our background
Highlight selected layers, right click, and select "Merge Layers" to combine several layers into one.

Wednesday, October 7, 2015
Look at the M:/ and select which skull template you want. Save a copy to your own folder.
Open your skull template in Photoshop.
 We will be learning:
- Use CTRL J to duplicate your background layer
-Use paint bucket to color your skull and background using complementary colors
-Drag and drop one of your stock photos as a new layer in your skull
-Use the Move tool to position your object
-Use Magic Wand tool to delete the white background from your stock image object
-CTRL T to resize/rotate/flip your stock image layer
-CTRL J to duplicate your stock image layer (to create a second eye, for example)
Tuesday, October 6, 2015
Same Plan as yesterday. I only have about half of the class's contact sheets, so we can have today to finish them. Today will be the last day to work in class. Tomorrow we learn to select and cut in Photoshop.
I will introduce Brusheezy.com for those people who would like to move on to downloading and installing brushes.
Grades are updated! Check your Aeries!
I will introduce Brusheezy.com for those people who would like to move on to downloading and installing brushes.
Grades are updated! Check your Aeries!
Monday, October 5, 2015
TURN IN STOCK PHOTOS
Today we will finish editing our stock photos and turn in our contact sheet. Name your contact sheet Lastname_Firstanme_StockPhotos.jpg or something similar. The lastname_Firstname is the important part. Make sure to save your file as a JPG!

Steps for running a contact sheet, in case you forgot:
1. Click FILE--> Automate--> Contact sheet II
2. Click Files and Browse
3.Select the files you want to include by holding control and clicking each one you want.
4. Leave the middle section of the menu alone- you only change the bottom section.
5. Change the columns and rows setting to 5 and 8.
6. Click OK, and hands off! Let Photoshop run.
When you are finished...
The end of the quarter is around the corner. You can get 20 points of extra credit to pad your grade! Some of the ways you can get points, just to remind you:
-Visit APimages.com and browse their collection. Pick an image you like. Write a 1 page critique based on the elements of art. (We did this in class- it's easier than it sounds! Go through and discuss what textures you see, what kind of shapes are present, what forms are present, the color schemes used- if any, any leading lines in the photo, what kind of value the image has, and the photographer's use of space. Use your element book as a guide! Use those key words.)
-Play in Photoshop. It is always good practice. Make a collage page of something you like!
-Visit an art gallery and write a page on what you see. Literally describe what pictures you see, who the artist is, what you like or do not like, etc.
-Take extra photos or make an extra version of any project we do.
Friday, October 2, 2015
Friday: Basic Edits on Stock Photos
You will be performing basic editing on your 40 stock photos.
1. Crop out excess white from the background (do leave a little bit. See below)
2. Do the levels on your photos (Image--> adjustments--> levels, or CTRL+L)
3. Hit CTRL+S to save your Jpeg
GOALS!
1. Finish at least 40 edited stock images
2. Run a contact sheet with 5 cols and 8 rows (File--> Automate--> Contact Sheet II)
3. Save the contact sheet as LASTNAME_FIRSTNAME_stock images.jpg
4. Pick the skull you like from the M:/ and save it to your files
See example of yesterday's stock photo with basic edits, and the example of a completed contact sheet below:

Thursday, October 1, 2015
Stock Images
Today we spent the period taking stock photos of items which symbolize day of the dead, such as: flowers, fruits, candy, and other adornments for a face. Photos should be clear and centered on a white background, such as the example below.

Take a shot of 50 different items! The more stock photos you have, the more options you have later.

Take a shot of 50 different items! The more stock photos you have, the more options you have later.
Subscribe to:
Comments (Atom)