Wednesday, December 16, 2015

Finals Schedule / Final Project

Business 8:00-8:25 AM
1st Final 8:25-9:55 AM

Break 9:55-10:13 AM
Passing 10:13-10:20 AM

Business 10:20-10:45
2nd Final 10:45-12:15

SMOKE SCULPTURES DUE AT THE END OF THE PERIOD

Here is an in-progress and a completed example:


Monday, December 14, 2015


Hi Guys,
Today we are working on ILLUSIONS. Remember, the name of the game here is experimentation and creativity. Just try things out, then look at your results and adjust your position/technique, and retry. Its all about trying-->adjusting-->trying again until you get it right.

TOMORROW IS THE LAST DAY TO BRING CANS FOR EXTRA CREDIT!
Bring them in advisement just to be safe, because I don't know when the people will pick the barrel up.


You will be turning in ONE contact sheet of your four BEST illusions with your partner. Yes, this one time you get to share work. Thats ONE contact sheet of four images with 2 people's last names on it.

Don't forget to do levels and basic cropping.

Thursday, December 10, 2015

Rainy Day schedule :( :( :(

Open a new document in Microsoft Word.
Click “insert” and insert your best photo yet. Resize your photo so it’s small enough to fit in the Word document.

Write a critique of your picture. (At the very least 1 page double spaced) Make your sentences complete and use descriptive language. This will be written like a discussion paper, not a numbered list.  

Here are steps to guide you for each paragraph:
1.     Describe your photo. What is the photo of? What objects can you see in it? Talk about the time of day, location, people, plant life, animals, building or other materials you see.
2.     Talk about the composition. What angles, or viewpoints were used to shoot the photo? Was the rule of thirds used, and how? (What objects or parts of the photo are lined up on what part of the grid)
3.     Describe the use of elements. Is shape used? Texture? Value, color, space, form, line?  Talk about where and how. If an element is not used, its ok to say so, for example: “This photograph does not use color since it is black and white” or simply, “There are no shapes in this photo”.
4.     Describe and discuss what you like about it and why.

5.     Describe and discuss what you think could be done differently and why.

Save your image as lastname_firstname_selfcritique.doc
Tomorrow we will be peer-reviewing them and checking for vocab usage.

Wednesday, December 9, 2015

Zero Gravity Illusions

Today we are starting our last project before winter break. Its creative, fun, and a little more challenging than it looks. Check out some examples below:


Tuesday, December 8, 2015

As with yesterday, today you will finish and turn in your nature name and contact sheet. If you are already finished, you may work on doing more names for extra credit OR you may do the short tutorial on zoom blur effects.

OR you may follow this link to learn to give a photograph jigsaw puzzle effect here:
http://www.photoshopessentials.com/photo-effects/photoshop-puzzle/

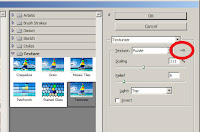
Don't worry, it looks REALLY long but it's just a lot of pictures. The steps are fairly simple. You might have trouble finding the "texturizer" because we have a different version of Photoshop than they do. Here's the trick:
Click Filter -->Filter Gallery-->Texture--->Texturizer

<---------Click this little settings tab.
Click Load Texture
Go to the M:/ Miss E folder and select the puzzle.psd file I have left there.Click Open. Play with the sliders until you like the look and size of your puzzle pieces.

Monday, December 7, 2015

Turn in your nature name AND alphabet contact sheet.

If you are finished early, you can create another nature name for someone else.
You can also check out the Miss E folder for a simple, quick little tutorial on how to create a zoom blur effect.

Thursday, December 3, 2015

Nature Alphabet

Continue working on collecting your Natural Alphabet.
Remember: SHOOT IN PORTRAIT ORIENTATION (You must turn the camera sideways)
Remember to SHOOT IN BLACK AND WHITE when possible

When you get back to your computer:
Rotate if needed by clicking Image-->Image Rotation-->90 CW
Remember to CROP TO A 5x7" on EVERY photo
Adjust your LEVELS on every photo

Save all of your letters in their own folder. If you finish editing EVERY picture (remember, they must be cropped to a 5x7!) you can run a 5 column, 6 row contact sheet.